
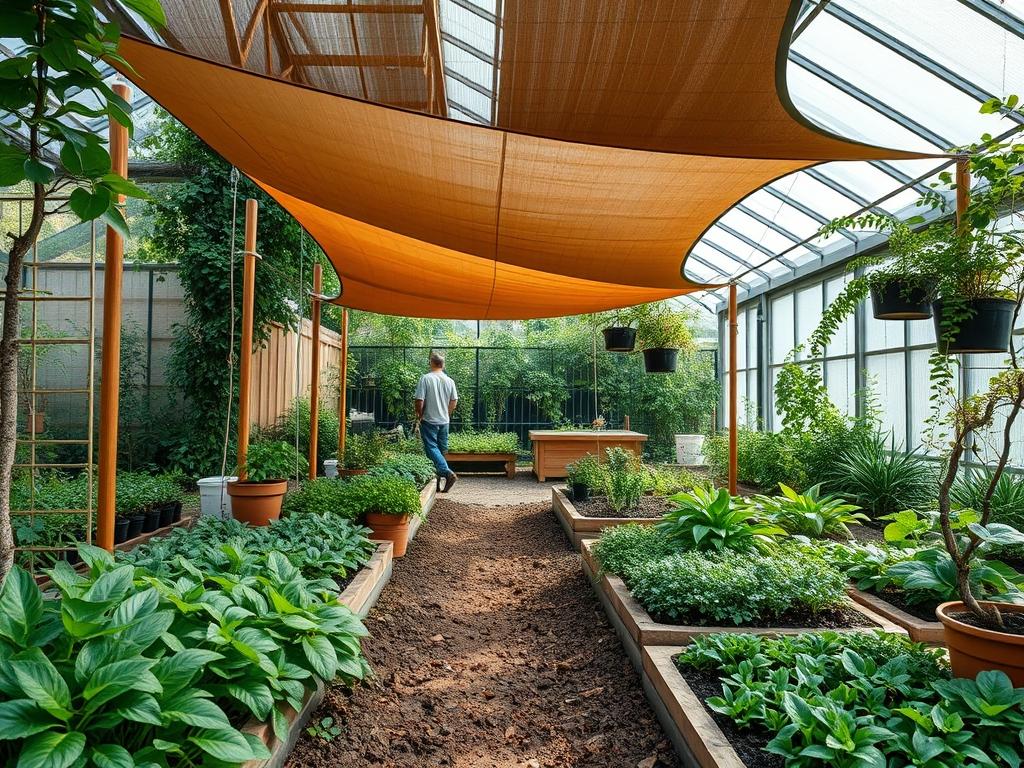
Residential outdoor environments often face the harsh reality of solar exposure, which can render a beautifully designed patio or garden unusable during peak daylight hours. Effective landscape architecture seeks to solve this problem by integrating functional structures with biological elements, creating a cohesive ecosystem that manages temperature while enhancing curb appeal. Shade sail installation serves as a transformative solution in this context, bridging the gap between rigid hardscaping and fluid softscaping. A well-planned installation does more than provide relief from ultraviolet rays; it defines the vertical volume of a yard, creates intimate outdoor rooms, and protects sensitive understory plantings from leaf scorch. When a landscape architect approaches a project, the goal is to balance the thermal mass of materials like concrete or stone with the cooling transpirational effects of vegetation, all while ensuring the structural integrity of the overhead canopy.
The visual impact of a shade sail is significant, acting as a modern architectural statement that can complement or contrast with the existing dwelling. By carefully selecting the height and angle of the attachment points, we can manipulate sightlines and direct the eye toward specific focal points, such as a water feature or a curated specimen tree. This strategic placement also considers the path of the sun throughout the seasons, ensuring that the shadow footprint aligns with seating areas during the hottest months. Beyond aesthetics, the functionality of the yard increases as the shade sail mitigates the heat island effect, allowing for a more diverse range of plant life to thrive in what would otherwise be a scorched, inhospitable microclimate.
Landscape Design Principles
Successful garden planning relies on the fundamental principles of symmetry and visual balance. When integrating a shade sail, we must consider the tension between the geometric, fabric lines and the organic shapes of the surrounding foliage. A common technique is to use the sail as a primary focal point, anchoring the outdoor living space. By varying the elevation layers of the canopy, a designer can create a dynamic “hypar” or hyperbolic paraboloid shape. This three-dimensional form prevents the structure from looking flat or stagnant, adding a sense of movement to the landscape.
Elevation layering extends beyond the fabric itself. In the ground plane, we utilize tiered planting beds to mimic the verticality of the sail. Low-growing groundcovers provide a foundation, while mid-sized shrubs and taller ornamental grasses transition the eye upward toward the sail’s mounting points. Irrigation planning is equally critical; the presence of a shade sail can create a rain shadow, where the ground beneath the fabric receives less natural precipitation. Consequently, a dedicated drip irrigation system should be mapped out during the initial design phase to ensure that the root zones of plants beneath the canopy remain hydrated without the risk of over-saturation in peripheral areas.
Walkways and circulation paths must be designed to flow naturally around the support structures of the sail. If Galvanized steel posts are used as mounting points, they should be integrated into the hardscape through the use of masonry wraps or strategic plantings that soften their industrial appearance. Visual balance is achieved by ensuring that the scale of the shade sail is proportionate to the surrounding garden beds and the home’s facade, preventing the structure from overwhelming the natural environment.
Plant and Material Selection
The following table outlines high-performance plant species and materials that complement the microclimates created by shade sail installation.
| Plant Type | Sun Exposure | Soil Needs | Water Demand | Growth Speed | Maintenance Level |
| :— | :— | :— | :— | :— | :— |
| Hydrangea macrophylla | Partial Shade | Loamy, acidic | High | Moderate | Medium |
| Liriope muscari | Sun to Shade | Well-drained | Low | Fast | Low |
| Buxus sempervirens | Sun to Part Shade | Neutral pH | Moderate | Slow | High |
| Heuchera | Shade to Part Sun | Rich, organic | Moderate | Moderate | Low |
| Acer palmatum | Dappled Shade | Moist, well-drained | Moderate | Slow | Medium |
| Festuca glauca | Full Sun | Sandy, lean | Low | Moderate | Low |
For the structural components, we recommend Grade 316 stainless steel hardware for all tensioning devices to prevent corrosion. The fabric itself should be a High-Density Polyethylene (HDPE) knit, which allows for airflow while blocking up to 95 percent of UV rays. For the ground plane, a combination of Decomposed granite for high-traffic paths and Premium cedar mulch for planting beds ensures a professional finish that retains moisture and suppresses weeds.
Implementation Strategy
The execution of a landscape plan involving shade sail installation begins with precise grading and drainage assessment. Proper slope is essential to ensure that runoff from the sail does not pool at the base of the support posts or inundate nearby planting beds. We begin by marking the locations for the footings, which typically require an Auger to reach depths of 36 to 48 inches, depending on local frost lines and wind load requirements.
Once the Sch 40 steel pipes are set in high-strength concrete, we transition to the softscaping layout. Edging is installed using 14-gauge steel headers to create crisp transitions between turf and mulch areas. This prevents the migration of materials and maintains the design’s geometric integrity. After the hardscaping is secure, we amend the soil with organic compost to a depth of 6 inches before placing the selected plant species. Each plant is positioned according to its future growth habit to avoid overcrowding.
The final stage of implementation involves the tensioning of the sail. We use Stainless steel turnbuckles to achieve a drum-tight finish. A loose sail is prone to wind damage and water pooling, which can jeopardize the health of the plants below due to sudden weight-induced failures. Once the sail is taut, a layer of Double-shredded hardwood mulch is applied at a depth of 3 inches across all garden beds, providing a polished look and protecting the newly established root systems.
Common Landscaping Failures
One of the most frequent errors in garden planning is the neglect of sub-surface drainage near heavy footings. When deep concrete piers are poured for shade sail installation, they can inadvertently act as underground dams, disrupting the natural movement of groundwater. This often leads to “wet feet” for nearby shrubs, causing root rot and eventual plant death. To mitigate this, we install Perforated French drains around the perimeter of the installation area to redirect excess water.
Another common failure is root overcrowding. Homeowners often plant fast-growing species too close to the sail’s support posts without considering the mature diameter of the root flare. Over time, these roots can put pressure on the concrete footings, potentially tilting the posts and compromising the tension of the sail. Furthermore, soil compaction during the construction phase is a silent killer of landscape vitality. The use of heavy machinery for post-hole digging can compress the soil pores, preventing oxygen and water from reaching the roots of existing trees. Always use Aeration tools or Radial trenching to remediate compacted zones before finishing the landscape.
Seasonal Maintenance
Landscape management is a year-round commitment that changes with the transit of the sun. In the spring, the focus is on “unveiling” the garden. This involves cleaning any debris from the shade sail fabric with a mild soap solution and a soft brush. Inspect the hardware for any wear and apply a light lubricant to the Turnbuckles. This is also the time for pre-emergent weed control and the application of balanced fertilizer to the Hydrangeas and Boxwoods.
During the summer, the primary task is irrigation monitoring. The shade sail will reduce evaporation rates in the soil directly beneath it, so soil moisture sensors should be checked to avoid overwatering. In autumn, the sail should be inspected for any sagging caused by thermal expansion or high-wind events. As deciduous plants like the Japanese Maple drop their leaves, ensure that organic matter does not accumulate on the fabric, as this can lead to staining and mildew. Finally, in winter, especially in climates prone to snow, the sail should be removed and stored to prevent structural failure from snow loads. The structural posts remain as architectural elements, while the garden beds are protected with a fresh layer of mulch to insulate the roots against the freeze-thaw cycle.
Professional Landscaping FAQ
How does shade sail installation affect my lawn’s health?
Shade sails reduce the amount of direct photosynthetically active radiation reaching the turf. For healthy grass, we recommend using shade-tolerant species like Fine Fescue or replacing the grass under the sail with permeable hardscaping or shade-loving groundcovers to avoid thinning.
What is the best way to clean my shade sail?
Use a low-pressure garden hose and a mild, biodegradable detergent. Avoid using harsh chemicals or power washers, as high pressure can damage the HDPE fibers and degrade the UV-stabilized coating, significantly shortening the lifespan of the canopy.
Can I attach a shade sail to my existing fence posts?
Generally, no. Standard fence posts are not designed to withstand the significant lateral tension generated by a taut shade sail. We recommend installing dedicated Schedule 40 steel posts anchored in deep concrete footings to ensure safety and structural longevity.
Will a shade sail protect my patio furniture from fading?
Yes, a high-quality shade sail blocks up to 95 percent of harmful UV rays. This significantly slows the degradation and fading of outdoor fabrics, wood finishes, and plastic resins, extending the life and aesthetic appeal of your outdoor investment.
How do I prevent mosquitoes from breeding near my shade sail?
Mosquitoes are attracted to standing water. Ensure your sail is installed at a sufficient angle, at least 20 degrees, to prevent water from pooling on the fabric. Additionally, ensure the surrounding landscape has proper drainage to eliminate puddles in the beds.