
Designing an outdoor environment requires a sophisticated understanding of how structural elements interface with the living landscape. A floating deck represents one of the most versatile solutions for modern backyards because it functions as an independent island of stability within a changing ecosystem. Unlike traditional decks that are physically bolted to a home foundation, a floating deck sits atop the soil on a system of blocks or piers. This detachment allows for greater flexibility in placement and circumvents many of the rigorous building codes associated with structural attachments. However, the apparent simplicity of floating deck construction can be deceptive. A successful installation must account for localized climate cycles, soil expansion, and the long term impact on property aesthetics. When planned correctly, these platforms transform unusable patches of uneven ground into premium outdoor living zones that enhance curb appeal and provide a clear purpose for the surrounding greenery.
Effective site selection for a floating deck involves more than just finding a flat spot in the yard. You must evaluate how the structure interacts with sunlight throughout the day and how it influences the natural flow of foot traffic. If the deck is placed in a low spot, it will inevitably succumb to rot as water pools around the substructure. Therefore, the first step in any professional plan is a thorough site analysis that identifies high points, drainage patterns, and prevailing wind directions. By understanding these environmental variables, you can position the deck to maximize comfort while minimizing the maintenance required to keep the wood or composite materials from degrading.
Landscape Design Principles
Modern landscape architecture relies on several core pillars to ensure a project feels intentional rather than accidental. Symmetry is a primary tool for creating a sense of order. When placing a floating deck, use the existing lines of your home or the perimeter of your garden to align the joists. A deck that sits slightly askew can create a subtle sense of visual tension that detracts from the relaxation of the space. To counter this, many designers use the deck as a focal point, drawing the eye toward the structure with lead-in paths or strategically placed shrubbery.
Elevation layers are equally critical. A floating deck should rarely sit more than 12 inches off the ground, but even a small height difference creates a distinct “room” in the yard. Using graduated levels, such as a lower stone patio that steps up onto the wooden deck, adds architectural depth. This layering helps to integrate the hardscaping with the softer elements of the garden. You must also plan for irrigation early in the design phase. Running pipes under a deck after it is built is a logistical nightmare; ensure all PVC irrigation lines and Low-voltage lighting wires are buried at least 6 inches below the final grade before the first joist is set.
Visual balance is achieved by contrasting the rigid, straight lines of the deck boards with organic shapes in the planting beds. If your deck is a sharp rectangle, surround it with curving garden borders to soften the impact. High-traffic walkways leading to the deck should be constructed from stable materials like Flagstone or Decomposed granite to prevent mud tracking onto the deck surface. When these elements work in harmony, the deck feels like a natural extension of the earth rather than a temporary wooden platform.
Plant and Material Selection
Selecting the right materials determines the longevity of the structure and the vibrancy of the surrounding flora. For the deck itself, Pressure-treated southern yellow pine is the industry standard for the substructure due to its resistance to decay. For the visible surface, Western red cedar or Capped composite boards offer superior aesthetics and durability. When it comes to the vegetation that will frame the deck, choose species that can handle the specific micro-climate created by the shadow of the structure.
| Plant Type | Sun Exposure | Soil Needs | Water Demand | Growth Speed | Maintenance Level |
| :— | :— | :— | :— | :— | :— |
| Boxwood Shrub | Full Sun to Shade | Well-Drained | Moderate | Slow | Low |
| Hosta | Partial to Deep Shade | Organic Rich | High | Medium | Very Low |
| Lavender | Full Sun | Sandy/Gritty | Low | Medium | Moderate |
| Switchgrass | Full Sun | Adaptable | Low | Fast | Low |
| Japanese Maple | Filtered Sun | Acidic/Moist | Moderate | Slow | Moderate |
| Creeping Thyme | Full Sun | Well-Drained | Low | Fast | Low |
Implementation Strategy
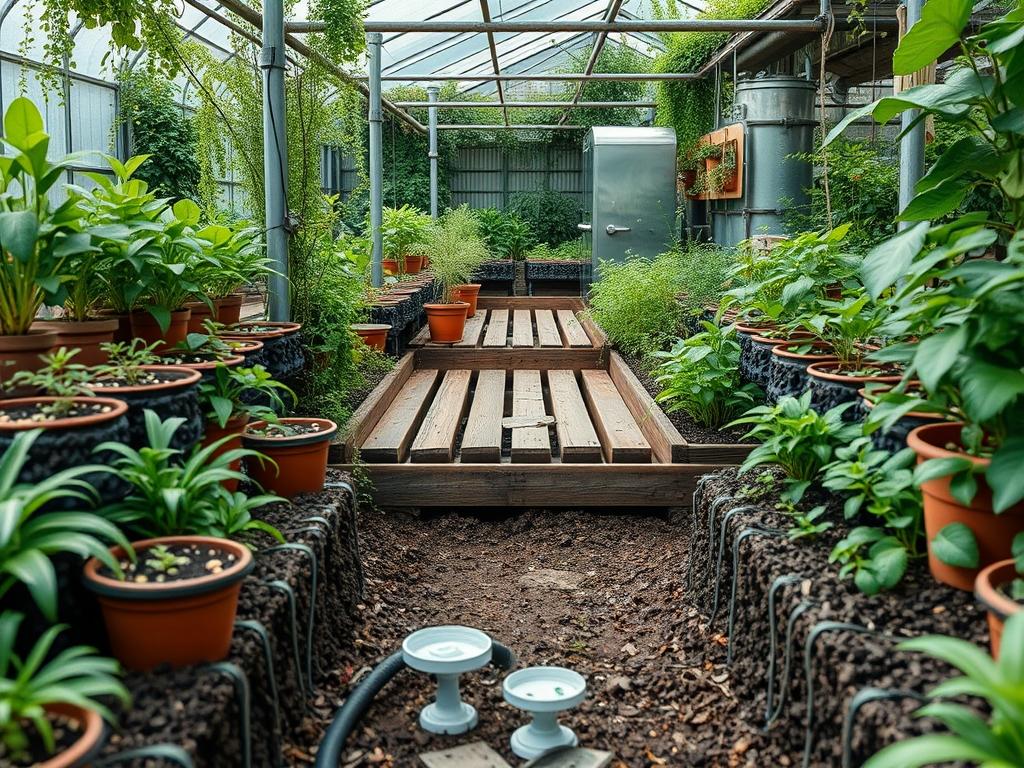
The process begins with meticulous ground preparation. Use Orange marking paint to outline the deck footprint, then remove all sod and topsoil within those boundaries. This area must be graded away from your home foundation at a slope of at least 2 percent to ensure water does not collect underneath. Once the ground is level, lay down a heavy-duty Non-woven geotextile fabric to suppress weed growth. Cover this fabric with a 3-inch layer of Crushed 57 stone or Pea gravel. This gravel bed serves as the drainage foundation for your Concrete deck blocks.
Position the deck blocks at intervals specified by your local span tables, usually every 4 to 6 feet depending on the size of your 2×6 joists. Use a 6-foot spirit level or a Laser level to ensure every block is perfectly aligned with its neighbor. When framing, treat every cut end of the lumber with Copper naphthenate to prevent premature rot. The joists should be spaced 12 inches or 16 inches on center, depending on the thickness of your chosen decking material.
Once the frame is complete, apply Butyl joist tape to the top of every beam. This tape acts as a moisture barrier between the boards and the frame, significantly extending the life of the wood. Fasten the deck boards using Stainless steel trim-head screws or a Hidden fastening system for a clean, professional finish. After the structure is in place, install Metal landscape edging around the perimeter to keep the mulch or decorative stone from migrating into the grass. A final layer of Triple-shredded hardwood mulch at a depth of 3 inches in the surrounding beds will provide a polished look while retaining moisture for your new plantings.
Common Landscaping Failures
The most frequent mistake in floating deck construction is ignoring sub-surface drainage. Even if the deck looks level on top, stagnant water sitting beneath the joists will create a breeding ground for mold and insects. If the soil is heavy clay, you may need to install a French drain system that carries water away to a lower point in the yard. Another common failure is root overcrowding. Many homeowners plant large trees too close to the deck edge, not realizing that as the roots expand, they will lift the Concrete deck blocks and warp the entire structure. Always research the mature root spread of any tree before planting.
Improper spacing between deck boards is another technical error. Wood naturally expands and contracts with changes in humidity; if boards are installed too tightly during a dry summer, they will buckle and cup during a wet winter. Use a 1/4-inch spacer to ensure consistent gaps for water drainage and airflow. Soil compaction is also a risk. If the area under the deck is not properly compacted with a Plate compactor before the blocks are set, the deck will settle unevenly over the first year, leading to a wavy or unstable surface. Finally, irrigation inefficiency often occurs when sprinkler heads are blocked by the deck or when overspray constantly soaks the wooden components. Adjust your nozzles to target the plants specifically, avoiding direct contact with the deck boards.
Seasonal Maintenance
Landscape management is a year round commitment that changes with the weather. In the spring, focus on cleaning. Use a Pressure washer on a low setting or a Stiff-bristled brush with a specialized deck cleaner to remove winter grime and algae. Check the integrity of the fasteners and tighten any screws that have backed out due to freeze-thaw cycles. This is also the time to apply a fresh coat of UV-resistant stain if you are using natural wood.
During the summer, monitor the moisture levels in the surrounding garden. The area immediately adjacent to a deck often dries out faster because the wood absorbs heat. Ensure your Mulch levels remain at 3 inches to protect the plant roots. In autumn, the primary task is debris removal. Falling leaves that get trapped in the gaps between deck boards will hold moisture and cause localized rot. Use a Leaf blower or Putty knife to clear the gaps.
Winter maintenance is mostly about protection. Avoid using harsh rock salt on a wooden or composite deck, as it can pit the surface and kill the nearby plants as it melts and runs off. Instead, use Sand or a Calcium magnesium acetate de-icer, which is safer for both the building materials and the environment. If you live in an area with heavy snowfall, use a Plastic shovel rather than a metal one to prevent scratching the deck surface.
Professional Landscaping FAQ
Can I build a floating deck over an existing concrete patio?
Yes, you can use Low-profile deck pedestals or Rubber shims to level the joists over concrete. This setup requires excellent drainage to prevent water from being trapped between the wood and the masonry surface.
What is the best way to prevent weeds under the deck?
Install a high-quality Heavy-duty landscape fabric secured with Steel sod staples. Cover the fabric with at least 2 inches of Clean gravel to block all sunlight, which is necessary for weed germination.
How do I choose between wood and composite materials?
Pressure-treated wood is budget-friendly but requires annual staining and sealing. Composite decking costs more initially but offers superior longevity and only requires occasional cleaning with soap and water to maintain its appearance.
Do I need a building permit for a floating deck?
Most jurisdictions do not require a permit if the deck is under 200 square feet, not attached to the house, and less than 30 inches above grade. Always verify local codes before beginning construction.
How far should plants be from the deck edge?
Maintain a minimum gap of 12 inches between the deck and mature plant foliage. This allows for necessary airflow to prevent mold growth on the boards and provides access for periodic cleaning and maintenance.