
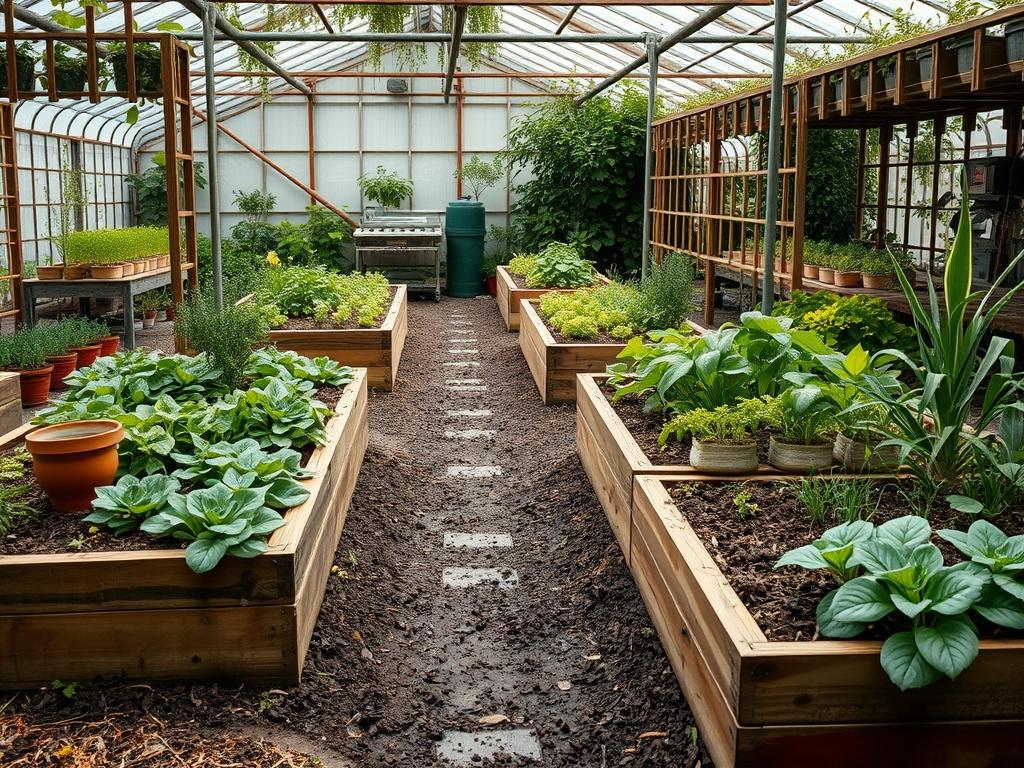
Landscape architects often encounter sites where the natural soil is depleted, overly compacted, or plagued by poor drainage. In these environments, Raised Bed Landscaping serves as a decisive design intervention that bypasses subterranean limitations while introducing architectural structure to the yard. These installations do more than just house plants; they define the geometry of an outdoor space, creating vertical interest and a sense of permanence that flat gardening often lacks. By elevating the planting surface, designers can control the microclimate, improve accessibility for maintenance, and significantly boost the curb appeal of a property through clean lines and high-quality materials.
The strategic use of raised beds allows for a sophisticated layering of textures and heights. In a traditional landscape, everything happens at the ground level, often leading to a visual “flattening” of the design. By incorporating heights ranging from 6 inches to 36 inches, a consultant can direct the eye, frame specific views, and create a physical boundary that separates pedestrian zones from horticultural zones. This elevation also facilitates better drainage and warmer soil temperatures in the spring, which extends the growing season for both ornamental and edible species. Whether the goal is a sleek modern aesthetic using Corten steel or a rustic feel with Cedar timbers, the choice of height and material defines the character of the entire landscape.
Landscape Design Principles
Effective design with raised beds requires a deep understanding of symmetry and focal points. When planning a layout, it is essential to consider the transition between the built environment and the natural one. Bilateral symmetry is a common approach in formal designs, where identical beds flank a central walkway of Crushed granite or Flagstone. This creates a sense of order and leads the eye toward a primary focal point, such as a water feature, a sculpture, or a specimen tree like a Japanese Maple. For more contemporary settings, asymmetrical groupings of beds with varying heights provide a dynamic, sculptural quality that mimics natural topography.
Elevation layers constitute the core of professional garden planning. Using tiered levels allows for the installation of “cascading” plant palettes, where trailing varieties like Creeping Jenny or Trailing Rosemary spill over the edges, softening the hard lines of the structure. Beyond aesthetics, irrigation planning is a vital principle. Professional installs typically hide 1/2-inch poly tubing beneath the soil surface, connected to a dedicated Automatic irrigation controller. This ensures that water is delivered directly to the root zone, reducing evaporation and preventing the staining of the bed’s exterior walls. Each bed should be treated as a distinct hydraulic zone to account for the specific water needs of the species within.
Walkway width is another critical factor in the design phase. To maintain visual balance and functionality, paths between beds should be no narrower than 36 inches, allowing for comfortable passage and the use of tools like a Wheelbarrow. This spacing ensures the landscape does not feel crowded as plants reach maturity. By integrating these beds into the broader master plan, the designer creates a cohesive environment where the transition from a hardscaped patio to a lush garden feels intentional and harmonious.
Plant and Material Selection
| Plant Type | Sun Exposure | Soil Needs | Water Demand | Growth Speed | Maintenance Level |
| :— | :— | :— | :— | :— | :— |
| Boxwood | Full Sun to Part Shade | Well-drained loam | Moderate | Slow | Low |
| Lavender | Full Sun | Sandy/Gravelly | Low | Moderate | Low |
| Purple Coneflower | Full Sun | Rich organic matter | Moderate | Fast | Medium |
| Switchgrass | Full Sun | Adaptable | Low | Fast | Low |
| Dwarf Fountain Grass| Full Sun to Part Shade | Moist/Well-drained | Moderate | Moderate | Low |
| Stonecrop Sedum | Full Sun | Gritty/Dry | Very Low | Moderate | Very Low |
| Hosta | Full Shade | Compost-rich | High | Moderate | Medium |
Implementation Strategy
The successful execution of a raised bed project begins with precise site grading. Even though the beds provide their own level planting surface, the ground beneath them must be stable and sloped away from any permanent structures to prevent water pooling. Once the footprint is marked using Lumber crayons or Layout strings, the top layer of sod should be removed. For heavy installations like Natural stone or Concrete masonry units, a base layer of 4 inches of compacted gravel is necessary to prevent settling over time.
For timber-based designs, such as Pressure-treated pine or Redwood, it is imperative to use Galvanized lag bolts or High-performance wood screws to secure the joints. Internal bracing with 2×4 stakes driven into the ground helps the walls resist the lateral pressure of the soil. Before filling the beds, a layer of Non-woven geotextile fabric can be applied to the interior walls to prevent fine soil particles from leaching through cracks. The soil itself should be a custom blend: often a mix of 60 percent topsoil, 30 percent compost, and 10 percent coarse sand to ensure optimal aeration and drainage. Finally, applying 3 inches of hardwood mulch across the surface will regulate temperature and retain moisture.
Common Landscaping Failures
One of the most frequent errors in Raised Bed Landscaping occurs at the drainage level. Many DIY installers falsely believe that placing a layer of large River rocks at the bottom of a bed improves drainage. In reality, this creates a “perched water table,” where the fine-textured soil meets the coarse rock, causing water to saturate the soil above the rocks and leading to Root rot. The soil should be continuous from top to bottom, or if the bed is on a hard surface, a genuine drainage system with Perforated pipe and Filter fabric must be used.
Root overcrowding is another sign of poor planning. Designers often select plants based on their size at the nursery rather than their mature spread. Within the confined space of a raised bed, aggressive species can quickly choke out slower-growing companions, leading to a decline in plant health and an unkempt appearance. Furthermore, soil compaction is a silent killer. Even in raised beds, if people or pets walk on the soil surface, the pore spaces collapse. This limits the oxygen available to the roots and impedes water infiltration. Irrigation inefficiency also plagues these designs; if the Drip emitters are not adjusted as the plants grow, the root balls may experience localized drought despite the bed appearing wet.
Seasonal Maintenance
Spring is the season of preparation and rejuvenation. During this window, landscape managers should test the soil pH and add Organic fertilizer or Pelletized lime as needed. It is also the time to inspect the structural integrity of the beds, checking for loose boards or shifting stones caused by the winter freeze-thaw cycle. Pruning of deciduous shrubs like Spirea or Hydrangea should be completed before new growth appears.
Summer maintenance focuses on water management and heat stress. As temperatures rise, the soil in raised beds dries out faster than the surrounding ground. Checking the Irrigation timers and refreshing the Mulch layer to keep the roots cool are the two most important tasks. Deadheading spent blooms on Salvia or Daylilies will encourage a second flush of color. In autumn, the focus shifts to sanitation. Removing fallen leaves and spent annuals prevents pests and fungi from overwintering in the soil. This is also the ideal time to incorporate Aged manure or Leaf mold to replenish nutrients lost during the peak growing months. Winter maintenance is largely passive, but in regions with heavy snow, it may be necessary to wrap sensitive evergreens in Burlap to prevent windburn or salt damage.
Professional Landscaping FAQ
How deep should a raised bed be for vegetables versus ornamentals?
Most vegetables require a minimum of 12 inches of soil depth for healthy root development. Ornamental shrubs and perennials benefit from 18 to 24 inches, ensuring enough volume for winter insulation and deeper anchoring of the root systems.
Can I build raised beds directly on a concrete patio?
Yes, but you must ensure adequate drainage. Use Pot feet or a Raised sub-frame to allow water to escape from the bottom. Without a clear exit path, the soil will become anaerobic and kill the plants.
What is the best material for a modern, minimalist look?
Corten steel is highly favored for modern designs. It develops a stable, rust-like patina that protects the metal while providing a slim profile. This allows for clean, sharp lines that standard Timber or Masonry cannot achieve.
Do I need to line my raised beds with plastic?
Avoid solid plastic, as it traps water and causes rot. However, lining the sides with Heavy-duty landscape fabric or Polyethylene can protect the wood from moisture. Always leave the bottom open to the ground for drainage and microbial activity.
How often should I replace the soil in a raised bed?
You do not need to replace the soil entirely. Instead, refresh the top 3 to 4 inches with High-quality compost every year. This restores organic matter and prevents the “sinking” effect that happens as old organic material decomposes.