
Integrating an outdoor shower into a residential landscape requires a sophisticated balance between utilitarian engineering and aesthetic harmony. The primary challenge involves creating a space that feels entirely private and secluded while remaining structurally integrated with the existing architecture and flora. A successful project considers the local climate, specifically how humidity and temperature shifts affect building materials and plant health. Beyond simple functionality, a well executed shower serves as a luxury amenity that boosts curb appeal and property value. It transforms a side yard or a forgotten corner into a functional retreat. From a consultant’s perspective, the goal is to manage water runoff efficiently while ensuring the materials selected resist rot, mold, and erosion. Designers must treat the shower not as an afterthought, but as a focal point that anchors the surrounding landscape.
Landscape Design Principles
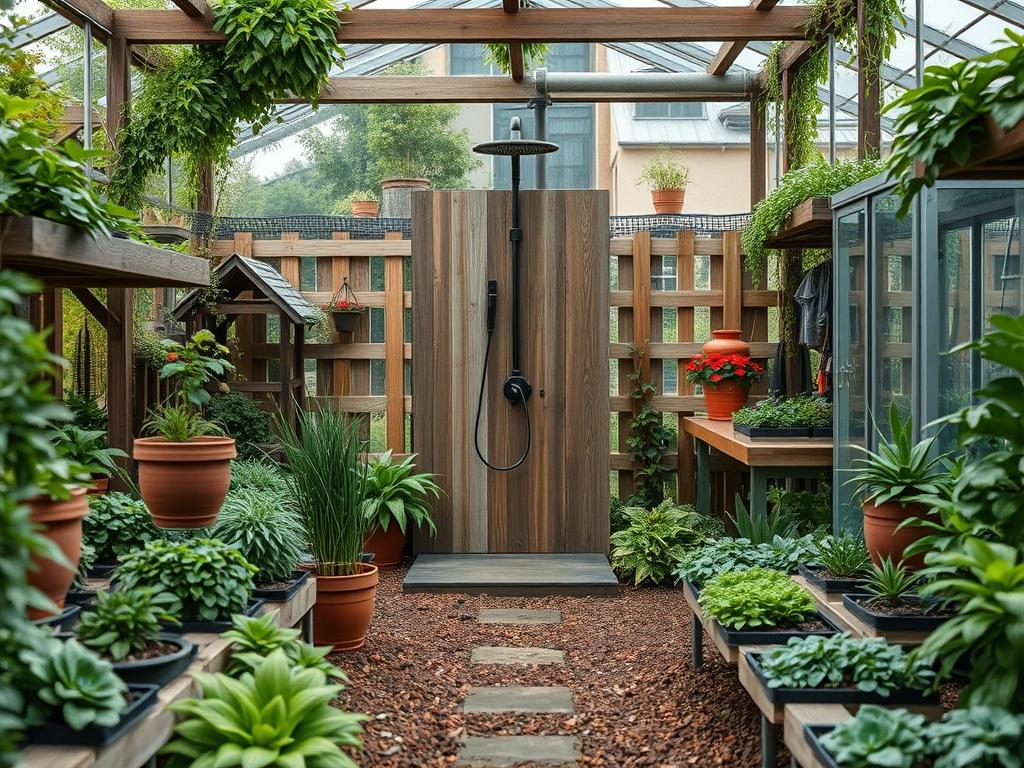
Effective outdoor shower design begins with the principle of spatial hierarchy. The shower should not interrupt the flow of the garden; instead, it should act as a destination. Achieving this often involves the use of focal points, such as a high-quality brass showerhead or a custom natural stone accent wall, to draw the eye toward the structure. Symmetry can be employed for formal gardens, where the shower is centered within a manicured space, while asymmetrical layouts work better for coastal or woodland themes.
Elevation plays a critical role in both the visual and functional aspects of the design. Elevating the shower platform slightly above the surrounding grade prevents garden debris from washing onto the shower floor. This slight rise also provides a logical transition for drainage. Irrigation planning must be adjusted around the shower zone to ensure that the supplemental water from bathing does not oversaturate nearby plants. Walkways leading to the shower should be constructed from slip-resistant materials like textured flagstone or decomposed granite, providing a safe path for bare feet. Visual balance is maintained by mirroring the height of the shower enclosure with mid-sized shrubs or small trees, preventing the structure from looking like an isolated box in the yard.
Plant and Material Selection
The materials and vegetation surrounding an outdoor shower must thrive in high-moisture environments. When selecting plants, focus on species that can handle occasional splashes of soapy water and high humidity. Hardscaping materials must be chosen for their durability and grip.
| Plant or Material Type | Sun Exposure | Soil Needs | Water Demand | Growth Speed | Maintenance Level |
| :— | :— | :— | :— | :— | :— |
| Clumping Bamboo | Full Sun to Part Shade | Well-Drained | Moderate | Fast | Low |
| Star Jasmine | Full Sun to Part Shade | Loamy, Moist | Moderate | Medium | Medium |
| Japanese Forest Grass | Part Shade to Full Shade | Rich, Humus | High | Slow | Low |
| Western Red Cedar | N/A (Material) | N/A | Low | N/A | Medium |
| River Rock | N/A (Material) | N/A | Low | N/A | Low |
| Leyland Cypress | Full Sun | Adaptable | Medium | Fast | High |
| Hydrangea Macrophylla | Part Shade | Rich, Moist | High | Medium | Medium |
For the enclosure itself, Ipe wood or Teak are the gold standards due to their innate resistance to rot and insect damage. If using stone, Pennsylvania Bluestone or Travertine provides a timeless look while offering a naturally cool surface for feet during the hot summer months.
Implementation Strategy
The implementation phase begins with professional grading. You must ensure the ground slopes away from the home foundation at a minimum of a 2 percent grade to prevent water intrusion. Once the grade is established, the footprint of the shower should be excavated to a depth of at least 8 inches to allow for a proper drainage base. A layer of compacted gravel followed by landscape fabric serves as the foundation for the final surface material.
If the shower will be used frequently, installing a French drain or a dry well is necessary to handle the volume of gray water. This involves a perforated pipe buried in a trench filled with crushed stone, which disperses the water slowly into the soil. For the edging, use heavy-duty steel edging or paver restraints to keep the transition between the shower floor and the garden beds crisp.
When it comes to the walls, consider a mix of hard and soft screening. A louvered wooden fence allows for airflow while maintaining privacy. Complement this with a 3-inch layer of cedar mulch in the surrounding beds to retain moisture for the privacy plants. Large terracotta pots can be used to add height and house tropical plants that might need to be moved indoors during colder months.
Common Landscaping Failures
The most frequent mistake in outdoor shower design is inadequate drainage. When water pools at the base of the shower, it creates a slip hazard and a breeding ground for mosquitoes. This often happens because the designer failed to account for the percolation rate of the local soil. Heavy clay soils require a much more robust drainage system than sandy soils.
Another common failure is root overcrowding. Designers often plant screening trees like Emerald Green Arborvitae too close to the shower plumbing. Over time, the roots can infiltrate the pipes or shift the leveling of the shower pan. Proper spacing, usually at least 3 to 5 feet from the main structure, is vital for long-term health.
Soil compaction is another issue that arises during the construction process. Heavy machinery or repeated foot traffic can crush the air pockets in the soil, leading to poor plant growth and increased runoff. To fix this, the soil should be aerated and amended with organic compost before any planting begins. Lastly, failing to use stainless steel fasteners or galvanized hardware will lead to unsightly rust streaks on the wood and stone surfaces within a single season.
Seasonal Maintenance
To keep an outdoor shower in peak condition, a seasonal maintenance schedule is mandatory. In the spring, inspect all plumbing fixtures for any damage caused by winter freezes. This is also the time to apply a fresh coat of UV-resistant sealer to any wood surfaces to prevent graying and splintering. Prune any encroaching branches from climbing vines to keep the shower area clear.
During the summer, check the drainage area for any signs of clogging from hair or organic debris. If you notice slow drainage, clear the gravel bed or the drain grate immediately. High humidity in the summer may also lead to algae growth on stone surfaces; a quick scrub with a stiff-bristle brush and a mild biodegradable soap will keep it clean.
Autumn requires the removal of fallen leaves from the shower floor and surrounding gutters. If leaves are left to rot on natural stone or wood decking, they can cause permanent staining. Finally, winter is the most critical period for maintenance. In colder climates, you must shut off the water supply and blow out the lines using a small air compressor to prevent the pipes from bursting. If the shower has a removable showerhead, store it indoors until the spring thaw.
Professional Landscaping FAQ
What is the best way to handle shower gray water?
The most sustainable method involves a dry well or a leach field. This allows the water to filter through layers of native soil and crushed stone, preventing runoff from entering the local storm drain system or neighboring properties.
Can I use regular garden plants around the shower?
Yes, but they must be moisture-tolerant. Species such as Ferns, Hostas, and Ornamental Grasses thrive in the humid microclimate created by the shower. Avoid plants that are sensitive to soil pH changes if using soaps frequently.
How do I ensure total privacy without building a roof?
Utilize vertical landscaping techniques. Tall, narrow plants like Sky Rocket Junipers or a trellis covered in Evergreen Clematis provide an organic screen that blocks sightlines from upper-story windows while maintaining an open-air feel.
What is the most durable flooring for an outdoor shower?
Thermally modified wood or porcelain pavers are exceptionally durable. Porcelain is non-porous and resists mold, while thermally modified timber undergoes a heat process that makes it virtually immune to rot and moisture expansion.
Do I need a landing pad or a full patio?
A 3-foot by 3-foot landing pad is the minimum requirement for comfort. However, extending the hardscaping to include a small changing area or a bench creates a more functional and luxurious sequence of movement within the garden.