
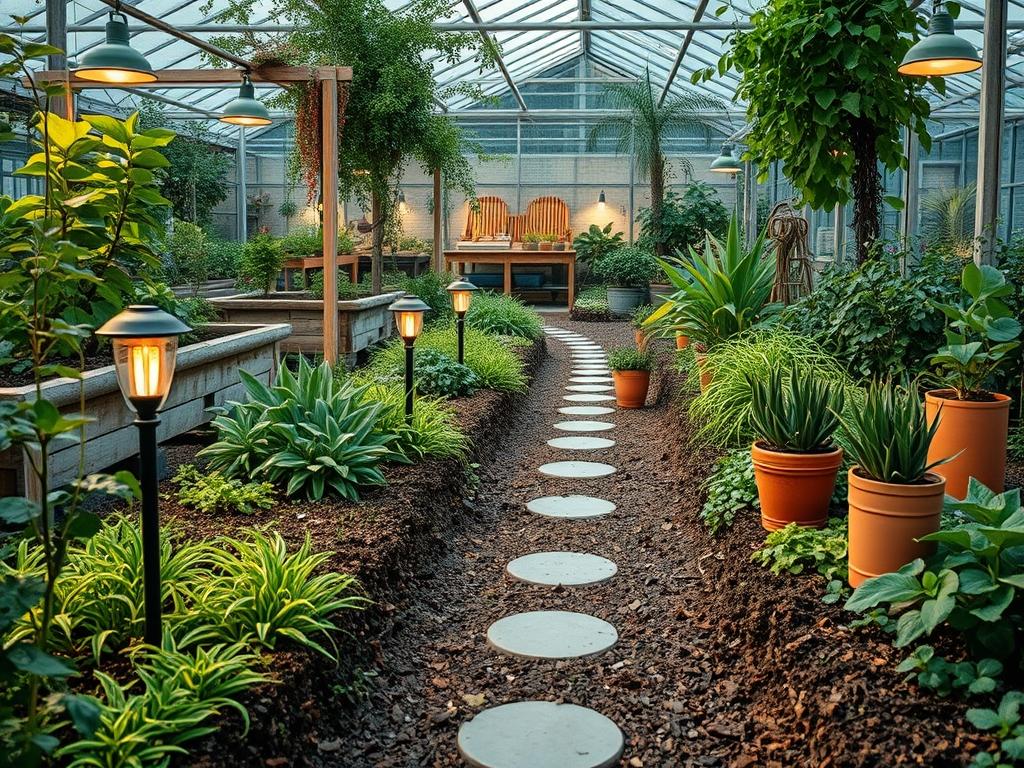
The transition of a landscape from daylight to dusk represents one of the most critical design shifts in modern architecture. Garden Path Lighting is no longer a mere safety feature intended to prevent trips and falls; it has evolved into a sophisticated tool for spatial definition and evening ambiance. A well-executed lighting plan extends the usability of outdoor living spaces, allowing the homeowner to enjoy the investment well into the night. From a consultant’s perspective, the primary challenge lies in balancing functional illumination with the preservation of the natural night environment. This requires a deep understanding of light temperatures, beam spreads, and the reflective properties of various hardscape materials. In temperate climates, fixtures must withstand significant moisture and temperature swings, necessitating high-quality materials like solid brass or copper that patina over time rather than corroding. Effective lighting increases curb appeal by highlighting the architectural lines of the home and the organic silhouettes of its surroundings, creating a cohesive narrative between the built and natural worlds.
Landscape Design Principles
The foundation of exceptional Garden Path Lighting begins with the principle of visual balance. Designers must resist the urge to create a runway effect, where fixtures are placed in perfectly straight, equidistant lines along a walkway. Instead, staggering lights creates a more organic, inviting rhythm that guides the eye through the property. Symmetry should be used sparingly, perhaps to frame a formal entrance or an allée of trees, but asymmetrical layering often feels more sophisticated in contemporary residential settings. Focal points are essential to this strategy. By illuminating a specimen tree like an Acer palmatum or a sculptural stone water feature, the designer provides a destination for the gaze, which prevents the garden from feeling like a dark, infinite void beyond the lit path.
Elevation layers play a vital role in depth perception. While path lights typically hover at 18 to 24 inches above the ground, integrating them with uplighting for larger trees and downlighting, often called moonlighting, from high branches creates a three-dimensional experience. This vertical variation ensures that the garden does not feel flat or compressed at night. Furthermore, integrating lighting with the overall site plan requires careful coordination with the irrigation system. For example, wiring must be buried deep enough to avoid disruption during future aeration or planting, and fixtures should be positioned so that high-pressure sprinkler heads do not cause internal water ingress. Proper walkways should be designed with a clear hierarchy, where primary paths are more brightly lit than secondary woodland trails, ensuring the visitor instinctively understands the flow of the property.
Plant and Material Selection
The materials chosen for a garden significantly impact how light is perceived. Dark, porous stones like slate absorb light, while lighter materials like travertine or white gravel reflect it, potentially reducing the number of fixtures required. The following plant selections are chosen for their unique structural qualities and how they interact with artificial light.
| Plant Type | Sun Exposure | Soil Needs | Water Demand | Growth Speed | Maintenance Level |
| :— | :— | :— | :— | :— | :— |
| Buxus sempervirens | Full Sun to Shade | Well-Drained | Moderate | Slow | High (Pruning) |
| Miscanthus sinensis | Full Sun | Adaptable | Low to Med | Fast | Low (Annual Cut) |
| Lavandula angustifolia | Full Sun | Gritty/Alkaline | Low | Moderate | Moderate |
| Hosta fortunei | Shade | Moist/Organic | Medium | Moderate | Low |
| Cornus stolonifera | Full Sun to Part | Wet/Moist | High | Fast | Moderate |
| Taxus baccata | Part Sun to Shade | Well-Drained | Medium | Slow | Moderate |
When selecting plants for path edges, consider the texture. Ornamental grasses like Miscanthus create beautiful shadows when backlit, while the dense foliage of Buxus can be used to hide the light source itself, allowing only the glow to escape.
Implementation Strategy
The implementation of a professional Garden Path Lighting system requires a systematic approach to the site layout. The process begins with a detailed topographical assessment to identify changes in elevation that might require dedicated step lighting or retaining walls for structural support. Once the layout is marked, the first physical step is often grading. Soil must be sloped away from the house and walkways to prevent pooling, which can damage both the hardscape and the electrical components. Small-scale French drains or catch basins should be installed in low spots before any lighting cables are laid.
Next, installers should focus on edging. Whether using steel edging, cobblestone, or poly-board, a clean break between the walkway and the planting bed provides a professional finish and protects the fixtures from mowing equipment. When trenching for low-voltage wire, a depth of at least 6 inches is recommended. The wire should be run inside PVC conduit in high-traffic areas or under driveways to prevent accidental cuts. After the fixtures are positioned and tested, a layer of hardwood mulch or pine bark should be applied at a 3-inch depth. This mulch serves a dual purpose: it suppresses weeds and provides a clean backdrop that makes the light “pop.” Finally, ensure that all hardscaping, such as pavers or flagstone, is set on a compacted crushed stone base to prevent shifting that could misalign the lighting fixtures over time.
Common Landscaping Failures
One of the most frequent errors in garden design is the neglect of proper drainage. When water accumulates around a light fixture, it can lead to short circuits or the premature degradation of the housing, even if it is outdoor rated. Another technical failure is the lack of consideration for root overcrowding. Planting a large tree too close to a path light or a shallow wire run results in the roots eventually lifting the fixture or snapping the cable. Designers must account for the mature size of the plant, not just its size at the nursery.
Improper spacing is another common pitfall. Placing lights too close together creates “hot spots” of glare that ruin the soft aesthetic of a night garden. Conversely, spacing them too far apart creates dangerous dark gaps. Soil compaction is often overlooked; heavily compacted soil prevents air and water from reaching plant roots and makes it incredibly difficult to make adjustments to the lighting system later. Lastly, irrigation inefficiencies can be detrimental. If a system is not properly zoned, water may consistently hit the warm lens of a light fixture, leading to mineral deposits and “hard water” staining that obscures the light output and creates an unsightly appearance during the day.
Seasonal Maintenance
A landscape is a living, breathing entity that changes with the seasons, and the lighting system must be maintained accordingly. In the spring, the primary focus is on inspection and cleaning. Check for “heaving” where winter frost may have pushed fixtures or stones out of the ground. Prune back any new growth that has begun to obscure the light output. This is also the time to check the transformer settings and ensure the timers are adjusted for the lengthening days.
During the summer, the focus shifts to hardware integrity and moisture control. As irrigation runs more frequently, periodically wipe down lenses with a soft cloth to remove dirt and residue. Ensure that mulch has not piled up too high around the base of the fixtures, as this can trap heat. In the autumn, the biggest challenge is leaf debris. Decomposing leaves can become acidic and may stain certain stone finishes or metal fixtures if left sitting too long. Clear leaves away from ground-mounted well lights to prevent fire hazards and ensure the light can actually reach its intended target. Finally, in winter, the goal is protection. If you live in an area with heavy snow, use markers to identify fixture locations so they are not damaged by snow shovels or blowers. Check the seals on all outdoor junction boxes to ensure that freezing and thawing cycles have not compromised the waterproofing.
Professional Landscaping FAQ
What is the best color temperature for outdoor lighting?
For residential landscapes, a warm white between 2,700K and 3,000K is ideal. This range enhances the natural greens of foliage and the earthy tones of stone without the harsh, blue appearance of higher-temperature commercial LEDs.
How do I prevent glare in my garden lighting?
Utilize fixtures with shrouds or “eyelids” that direct light downward toward the path. Avoid pointing spotlights directly at eye level. Aim for the “hidden source” technique where the viewer sees the effect of the light rather than the bulb.
Can I mix solar and hardwired lighting?
While possible, it is not recommended for professional results. Solar lights often lack the consistency, brightness, and longevity of low-voltage systems. Hardwired systems provide a reliable, uniform glow that can be dimmed or programmed with precision.
How many lights do I need for a 50-foot path?
Typically, you should space path lights every 6 to 8 feet, staggered on alternating sides. This creates a balanced wash of light. The exact number depends on the fixture’s lumen output and the width of the walkway.
Is LED lighting better than halogen for gardens?
Yes, LEDs are superior for modern landscapes. They consume up to 80 percent less energy, last significantly longer, and produce much less heat. Lower heat output reduces the risk of burning sensitive foliage that may come into contact with the fixture.