
Successful gazebo placement begins long before the first post is set in the ground. As a landscape architect, I view the gazebo not merely as an isolated structure, but as the focal point of a cohesive outdoor ecosystem. The primary challenge involves balancing the structural weight of the pavilion with the organic fluidity of the surrounding garden. Strategic positioning must account for the transit of the sun, prevailing wind patterns, and the “borrowed view” from neighboring landscapes. When properly integrated, a gazebo enhances curb appeal by providing a sense of scale and destination, drawing the eye toward a specific point of interest while offering a functional refuge from the elements. Climate considerations are equally vital; a structure placed in a low-lying frost pocket will be uncomfortable in the spring, while one positioned without regard for the summer solstice may become an oven during peak afternoon hours.
Landscape Design Principles
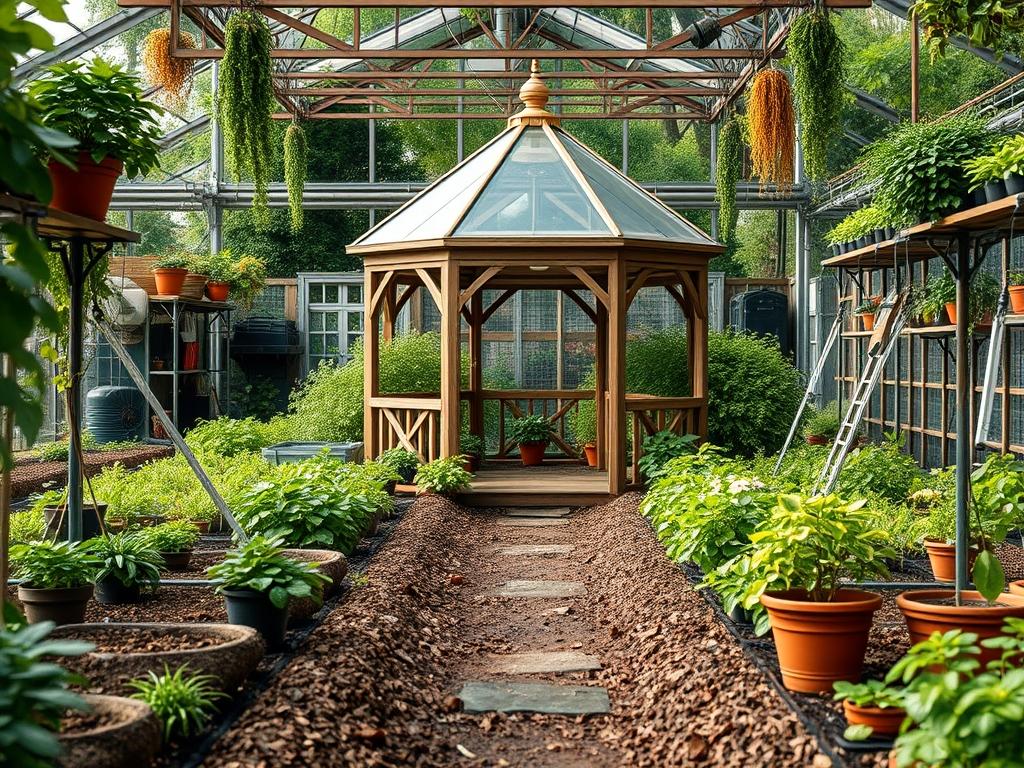
Achieving visual harmony requires a deep understanding of symmetry and the visual axis. A gazebo should ideally sit at the terminus of a primary or secondary walkway, creating a clear destination that invites exploration. We often use the concept of elevation layers to ground the structure. This involves placing lower-growing groundcovers like Creeping Thyme in the immediate foreground, transitioning to mid-sized shrubs, and eventually anchoring the gazebo with taller specimens like Emerald Green Arborvitae or a specimen Japanese Maple. This layering prevents the structure from appearing as if it dropped out of the sky and onto the lawn.
Elevation also plays a practical role in drainage and view optimization. If the site is perfectly flat, the gazebo can feel stagnant. Introducing a slight lift, perhaps via a low stone plinth or a calculated grade change, provides a commanding view of the garden. Conversely, on sloped terrain, Retaining Walls built from Natural Fieldstone or Cast Concrete Blocks can create a level terrace. This architectural intervention requires careful Irrigation Planning to ensure that water moves around the structure rather than pooling at the foundation. Symmetrical plantings often flank the entrance to the gazebo, but an asymmetrical approach using varying textures can offer a more contemporary, naturalistic feel that softens the rigid lines of the roof.
Plant and Material Selection
The materials surrounding the gazebo should complement its style, whether it is a rustic cedar build or a modern steel pavilion. Choosing the right “softscape” ensures the structure feels lived-in and private.
| Plant Type | Sun Exposure | Soil Needs | Water Demand | Growth Speed | Maintenance Level |
| :— | :— | :— | :— | :— | :— |
| Star Jasmine | Full Sun to Part Shade | Well-drained, Rich | Moderate | Fast | Low |
| English Boxwood | Full Sun to Shade | Loamy, Well-drained | Low | Slow | Medium |
| Lavender | Full Sun | Sandy, Alkaline | Low | Moderate | Low |
| Climbing Rose | Full Sun | Nutrient-rich | High | Moderate | High |
| Emerald Green Arborvitae | Full Sun to Part Sun | Moist, Well-drained | Moderate | Moderate | Low |
| Hostas | Full Shade to Part Shade | Moist, Humus-rich | Moderate | Moderate | Low |
For hardscaping materials, Crushed Granite or Pea Gravel provides a permeable surface that manages runoff effectively. For a more permanent feel, Flagstone set in a Stone Dust base offers a timeless aesthetic. If the gazebo is intended for dining, a smooth, level surface is non-negotiable to prevent furniture from wobbling.
Implementation Strategy
The transition from a blueprint to a physical retreat requires a disciplined installation sequence. The process starts with a thorough site analysis and a Laser Level to determine the high and low points of the yard.
1. Site Marking: Use Surveyor’s String and Orange Marking Paint to outline the gazebo footprint plus a 3-foot perimeter for working space. This allows you to visualize how the structure affects the existing flow of the garden.
2. Grading and Drainage: Excavate the area to a depth of 6 inches. If the site is prone to moisture, install a French Drain using 4-inch Perforated PVC Pipe and 1-half inch Clean Crushed Stone. This ensures the wooden or metal base of the gazebo remains dry, preventing rot and corrosion.
3. Sub-base Preparation: Lay down a Geotextile Fabric to prevent weed growth and soil migration. Add 4 inches of Crushed Aggregate (3/4-minus) and compact it using a Power Tamper or Plate Compactor until the surface is rock-solid.
4. Edging: Install Steel Edging or Tumbled Brick Edging to define the perimeter. This creates a crisp line between the seating area and the planting beds.
5. Softscaping and Mulch: Once the gazebo is built, install the larger “anchor” plants first. Finish with a 3-inch layer of Hardwood Mulch to retain moisture and regulate soil temperature. Ensure the mulch is kept 2 inches away from the base of any wooden posts to avoid moisture wicking.
Common Landscaping Failures
The most frequent mistake in gazebo placement is ignoring the long-term growth of the surrounding flora. A sapling planted 3 feet from the gazebo may look proportional today, but in a decade, its root system can heave the foundation, and its canopy may scrape the roofing material. Root overcrowding leads to competition for nutrients, eventually killing the very plants intended to beautify the space.
Another significant failure is poor soil compaction. Many DIY installations skip the Plate Compactor step, leading to a gazebo that tilts as the earth settles over the first two winters. Improper drainage is equally catastrophic. If a gazebo is at the bottom of a slope without a Catch Basin or proper grading, it will become a swampy, mosquito-ridden area rather than a sanctuary. Finally, irrigation inefficiencies occur when homeowners forget to adjust their sprinkler heads. Constant overspray on wooden railings will cause the finish to peel and the wood to warp within a few seasons.
Seasonal Maintenance
To preserve the garden views and the integrity of the structure, a seasonal schedule is mandatory.
- Spring: Inspect the foundation for shifting. Clear any debris from the French Drains and gutters. Prune Climbing Roses or Star Jasmine to direct growth away from the roof shingles.
- Summer: Monitor the soil moisture levels. Heavy structures can create “rain shadows” where the ground beneath the eaves stays bone-dry even after a storm. Supplemental hand-watering may be required for plants near the gazebo walls.
- Autumn: Remove fallen leaves from the roof and the perimeter. Decaying foliage trapped against the base of the gazebo holds moisture and invites wood-boring insects. This is also the time to apply a fresh 2-inch layer of bark mulch.
- Winter: In heavy snow regions, ensure the weight on the roof does not exceed its load capacity. Use a Poly Shovel to clear a path to the gazebo, taking care not to strike the edges of the structure or any dormant perennials nearby.
Professional Landscaping FAQ
How far should a gazebo be placed from the house?
Position the gazebo at least 15 feet from the main residence. This distance creates a distinct “outdoor room” feel while ensuring the structure does not block natural light from entering your home’s windows or obstruct primary views.
Is a concrete slab necessary for a gazebo foundation?
While not always required, a concrete slab provides the best stability for heavy structures. However, a well-compacted Crushed Stone base with Deck Blocks or Concrete Piers is often sufficient and allows for better soil drainage.
How do I prevent my gazebo from feeling isolated?
Connect the gazebo to the rest of your landscape using a visible pathway. Use materials like Flagstone or Stepping Stones and flank the path with repeating plant groups to lead the eye toward the structure.
Can I place a gazebo directly under large trees?
Avoid placing a gazebo directly under a dense canopy. Falling limbs can damage the roof, and dripping sap or bird droppings require constant cleaning. Instead, position it near the “drip line” for shade without the overhead risks.
What is the best way to handle roof runoff?
Install a small Gravel Trench or a Rain Garden around the perimeter. This captures the concentrated stream of water falling from the eaves, preventing erosion and keeping the splashing mud off the gazebo’s lower vertical surfaces.