
Designing a modern outdoor space requires a delicate balance between aesthetic beauty and functional sustainability. Homeowners often struggle with the transition from daytime vibrancy to nighttime utility, frequently relying on high-voltage lighting systems that increase energy bills and require complex underground wiring. Solar Garden Pathways represent a sophisticated solution to this challenge, offering a way to illuminate the architectural features of a landscape without the environmental or financial costs of traditional electrical grids. When we approach a project as consultants, our goal is to enhance curb appeal while considering the specific microclimate of the site. A well-lit path does more than prevent trips; it guides the eye, defines the boundaries of outdoor rooms, and showcases the textures of the plants that line the way.
Effective landscape lighting must account for the seasonal shift in light availability. In regions with shorter winter days, the efficiency of the photovoltaic cells becomes the primary design constraint. We evaluate the property for potential shadows cast by Retaining Walls, eaves, or mature tree canopies that might block the conversion of sunlight into stored energy. By integrating solar technology directly into the garden’s bones, we create a self-sustaining ecosystem that responds to the natural rhythm of the day. This approach transforms a simple walkway into a choreographed experience, where the interplay of shadow and soft light highlights the depth of the garden’s elevation and the precision of its hardscaping.
Landscape Design Principles
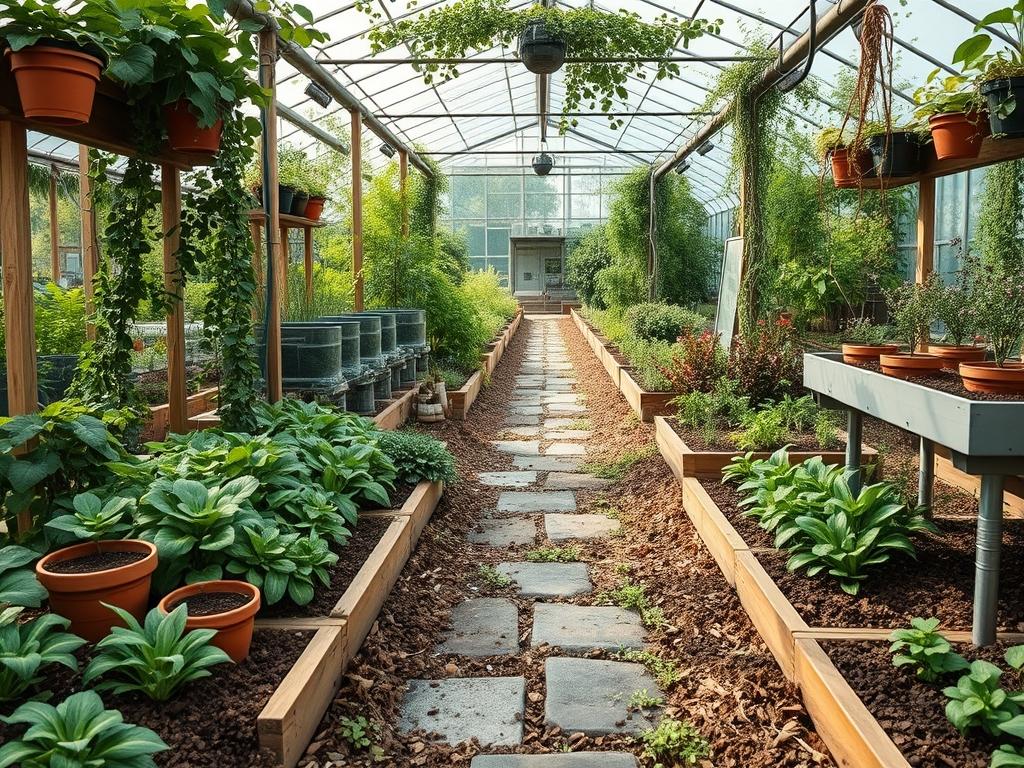
Symmetry and visual balance are the cornerstones of a professional garden layout. When planning Solar Garden Pathways, we avoid the common mistake of placing lights in a perfectly straight, tightly packed line, which creates a “runway” effect that feels sterile and industrial. Instead, we utilize a staggered arrangement that mimics the natural flow of the environment. This technique provides adequate coverage while allowing the light to spill softly into the surrounding foliage. We treat the lighting fixtures as secondary focal points that support the primary elements of the garden, such as a Water Feature or a specimen tree.
Elevation layers play a critical role in how light interacts with the landscape. By placing solar fixtures at varying heights, we can illuminate both the ground plane and the understory of the planting beds. For example, low-profile path lights can highlight the texture of Crushed Granite or Decomposed Granite, while taller bollard-style solar lights can cast a glow onto the mid-level shrubs. This layering prevents the landscape from looking flat at night. Furthermore, we must consider irrigation planning during the design phase. Solar units are water-resistant but not waterproof; therefore, they should be positioned away from the direct spray of high-pressure sprinkler heads to prevent internal corrosion and mineral buildup on the sensors.
Visual balance also involves managing the color temperature of the light. We typically recommend fixtures with a Kelvin rating between 2700K and 3000K, which produces a warm, inviting glow. This warmth complements the natural greens and browns of the garden, whereas higher Kelvin ratings can produce a harsh, blue light that feels clinical. By selecting high-quality Monocrystalline solar panels, we ensure that the batteries charge efficiently even on overcast days, maintaining the harmony of the design regardless of the weather.
Plant and Material Selection
| Plant Type | Sun Exposure | Soil Needs | Water Demand | Growth Speed | Maintenance Level |
| :— | :— | :— | :— | :— | :— |
| Creeping Thyme | Full Sun | Well-drained | Low | Moderate | Low |
| Blue Fescue | Full Sun | Sandy/Loamy | Low | Moderate | Very Low |
| Lavender | Full Sun | Gritty/Alkaline | Low | Fast | Medium |
| Stonecrop Sedum | Full Sun/Part Shade | Porous/Dry | Very Low | Fast | Low |
| Liriope Muscari | Full Shade/Sun | Adaptable | Moderate | Moderate | Low |
| Dwarf Boxwood | Part Sun | Rich/Moist | Moderate | Slow | High |
Implementation Strategy
The process begins with a thorough grading of the site. A pathway must have a slight slope, typically a 2 percent grade, to ensure that water moves away from the center of the walkway and into the drainage system. Once the ground is leveled, we install a high-quality Geotextile Fabric to prevent weed growth and provide a stable base for the hardscaping materials. Edging is then installed to create a crisp border between the path and the garden beds. We prefer using Steel Edging or Aluminum Paver Restraints for their durability and slim profile, which allows the solar fixtures to be tucked closely against the edge without interference.
When placing the Solar Garden Pathways fixtures, we use a Rubber Mallet to secure the stakes into the ground, ensuring they are perfectly vertical. If the soil is compacted, we pre-drill a hole rather than forcing the stake, which can damage the delicate internal wiring or the plastic housing. After the fixtures are set, we apply a layer of Hardwood Mulch at a depth of 3 inches. This depth is optimal for moisture retention around the plants while remaining thin enough to avoid burying the base of the solar lights. We also integrate a French Drain system if the path sits at the bottom of a slope, directing runoff into a designated dry well to protect the path’s integrity.
Common Landscaping Failures
One of the most frequent errors in solar lighting design is the failure to account for “light pollution” and “dark sky” compliance. Overpowering a small garden with too many high-lumen fixtures destroys the ambiance and can disturb local nocturnal wildlife. Another significant failure is poor drainage. If a path is not properly graded, water will pool around the base of the solar lights. This leads to soil saturation, which can cause the fixtures to lean or sink, and eventually, the moisture will penetrate the battery compartment, causing the unit to fail prematurely.
Root overcrowding is another issue we often see in DIY projects. When plants like Hostas or large ferns are placed too close to the path, they eventually grow over the solar panels. This shading prevents the battery from reaching a full charge, leading to lights that dim or turn off only a few hours after sunset. Furthermore, soil compaction is a silent killer of garden health and lighting stability. When the soil is too dense, it lacks the oxygen necessary for root respiration and prevents proper drainage, leading to “wet feet” for the plants and a shifting foundation for the pathway materials.
Seasonal Maintenance
Maintaining Solar Garden Pathways requires a proactive approach throughout the year. In the spring, the focus is on cleaning. We use a soft, damp Microfiber Cloth to wipe away the pollen, dust, and bird droppings that have accumulated on the solar panels. We also check the Pruning needs of nearby foliage to ensure that new spring growth is not casting shadows on the sensors. This is also the time to inspect the battery terminals for any oxidation and replace the NiMH or Lithium-ion batteries if they are more than two years old.
During the summer month, the primary concern is heat management and irrigation. High temperatures can degrade battery life, so we ensure that the soil around the fixtures remains relatively cool through adequate mulching. In autumn, the removal of fallen leaves is paramount; a single large maple leaf can completely block a solar panel, rendering the light useless. We also suggest checking the alignment of the fixtures, as the ground can shift during the transition from dry to wet seasons. Winter maintenance involves clearing snow from the panels immediately after a storm. If the ground undergoes a Freeze-Thaw Cycle, we inspect the stakes for “frost heave,” which can push the lights out of the ground, and we gently re-seat them as needed once the soil thaws.
Professional Landscaping FAQ
How many lumens do I need for pathway lighting?
For most residential paths, a range of 50 to 200 lumens per fixture is ideal. This provides enough light for safety and navigation without creating glare or washing out the surrounding landscape features and plant textures.
Can solar lights work in the shade?
While they perform best in direct sun, many high-quality units can charge in partial shade. However, the battery will not reach full capacity, resulting in shorter run times and dimmer illumination compared to fixtures in clear, sunny locations.
What is the best material for a solar pathway?
Permeable Pavers or Natural Flagstone are excellent choices. These materials allow water to reach the soil while providing a stable, level surface for the solar stakes. They also reflect light subtly, improving the overall visibility of the walkway.
How long do solar path batteries typically last?
Most rechargeable solar batteries, such as LiFePO4 or NiMH types, last between 18 and 24 months. To maintain peak performance, we recommend annual testing of the light duration and replacing the cells when efficiency drops below 50 percent.
Why are my solar lights flickering at night?
Flickering is often caused by a “false dusk” scenario where the light from one fixture hits the sensor of another. It can also indicate a dying battery or a dirty sensor that reflects its own light back, causing the unit to cycle.